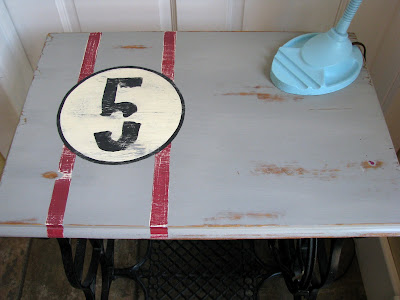
This table has been my nightstand for at least (uh, hum) 20 years!!! I still can't believe I've had anything for twenty years. I'm only 19 after all :-) Of course I didn't get a before pic...why?...I forgot. But basically the top was stained wood. It was a little worn in a few spots but not bad. A few months ago I painted another table and liked it enough to use it as my new nightstand.
I couldn't decide what to do with this one so it sat, and sat, and sat at the foot of my bed. Finally I'd had enough and brought it downstairs to take to the basement. And you know how sometimes when you move something into a new environment an idea comes out of nowhere? That's what happened here. BAM!!! An idea!
First, I measured the top of the table then went to the computer to map it out. I chose the number 5 just because that's the number of people in our family. The shape of that number also looked great in the circle.
To transfer the design onto the table I used an old technique I learned many years ago. I took a soft pencil and colored on the back of the computer print out; turned the design over and taped it to the table. Then simply traced over the lines, removed the paper and voila there's a great imprint. It works like a charm!
I decided to paint the whole design a creamy white first. I knew I wanted to distress the table heavily and thought a layered look would give it more depth.
Next, I taped off the stripes. They didn't need to be perfectly straight but I did want them the same width all the way down.
To finish this off, I painted the number and circle border black. I was very tempted to distress this right away but waited until the next day so the latex paint had time to cure. Oh, I almost forgot...I used Annie Sloan Chalk Paint in paris gray for the table top. I knew this would distress beautifully.
The next morning I was so excited to get up and finish this table. As planned, I distressed the table heavily and applied two coats of wax for protection.
I'm sooooo happy with the way it turned out. And layering the paint worked beautifully. I love how the white paint peeks out from under the red stripes.
I will be linking up to Miss Mustard Seeds Furniture Feature Friday link party. Also, Funky Junk Interiors Saturday Night Special as well as the Sister Sunday Link Party at Sisters of the Wild West. And last but not least Shades of Amber Chalk Paint Link Party. I'm real excited to see what everyone else has been up to this week. Take a peek for yourself. Have a great weekend everyone and keep cool!!!


14 comments:
What a sweet table. I loved your tip about transferring the design.
What a fun piece! It turned out soooo cute! Deb
This is great! I love the extra pizzazz you added with the stripes and the circle! Thanks for visiting Red Hen Home!
Very nice! Reminds me of the race cars on the salt flats!!!!! So cute I may have to steal the idea!!!! :) LOVE the colors....
You are so talented! I always admire people who can use the whole computer&stencil idea :) jealous!
Tina
I love it! That's a great tip for the stencil transfer!
Love how this turned out...I haven't tried that paint yet, but it is on my list of things to try! Enjoy your ""new" table!
this turned out awesome!! i would love to have you link it up at our party.
www.Sistersofthewildwest.blogspot.com
I love this! I'm going to feature it on my blog on Wednesday. The colors are great, the distressing is just right and I love the number 5. :) Such a super fun table.
Nice work.
Rachel
http://www.holy-craft.blogspot.com
Just stopped by to let you know I TOTALLY used your little stencil trick with a painted stool project I did over the weekend! THANK YOU for sharing that, it made my life 20x easier! The link is what I used it on. :)
http://www.etsy.com/listing/78435865/personalized-hand-painted-character
we featured you today! thanks for linking up! come grab a button!
Amy
WOW! What a beautiful transformation. Love this idea. Visiting from Shades of Amber.
Your little table is too cute! Nice job on the stenciling and the distressing looks fantastic. I've linked this to my accent tables post too, well done!
I was looking at a google image search for some red and gray inspiration for the children's table and chairs I'm working on. and this table popped up. I love it. Then I saw some of your other posts and loved them all too! I'm your newest member :) I'm in Illinois too!~the burbs of chicago :)
Post a Comment