Here's a before picture of the wall in his room...pretty plain.
Let me say at the beginning this project takes a lot of patience. I measured once, twice and even a third time. I didn't want to get half-way through and realize I made a mistake somewhere in the beginning. I'm talking from experience :-)
You can read a precise step-by-step tutorial on the Design Dazzle blog. Why reinvent the wheel right? But I will give you the cliff notes and show you my photographic step-by-step. To get started make sure you have a lot of green frog tape. This has become my "go to" whenever I need to tape something off for painting. I have found that blue painters tape just bleeds too much for me.
To figure out the diamonds I first needed to determine how many rows and columns we wanted on the wall. There is even an online calculator at Silver Spoon Murals to figure this out. I love the internet!!! At first we couldn't decide on three or four rows so I cut out diamonds in each size and decided on 3. Sometimes once you "see" it, you just know.
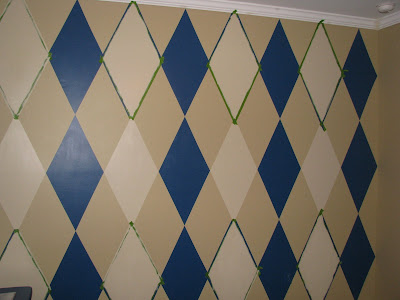
Once that decision was made the measuring began. Basically, I drew a bunch of rectangles on the wall. Then found the middle of each rectangle and marked the top, bottom, right and left side. I connected the dots by taping to form the diamond pattern.
I taped off all the blue diamonds first (every other row) and painted those. Once the paint dried I did the same thing for the light tan diamonds. I think it was about at this point my nephew Liam walked into the room and said "It looks like a big giant sweater."
Just an FYI: I went through two rolls of the green frog tape. And that was with reusing many of the pieces. If you don't want to reuse any I would say you'd need at least three rolls and perhaps four.
I have to admit I REALLY didn't want to do this next step. On the tutorial I read they used a stencil to make the fine dashed lines. I was concerned it was a bit too busy. I needed to figure out how to make a solid thin line. Back to the green frog tape.
First my brother-in-law and I placed chalk lines where the fine lines would be. Then I began taping...again :-)
I taped in one direction first. Painted those lines black, removed the tape then repeated this step in the other direction.
Here's a close-up view.
And here's the finale. My sister really liked it and I hope her son will too. He will be home from grandma and grandpa's tomorrow. I can't wait to hear what he has to say! I'm also painting a nightstand for his room but didn't get the time to finish it before we had to head home.
The kids had a great time playing with their cousins. And I can check a project off my list...a pretty good week!
I'm linking to

Check out what others have done this week! It's always inspiring.


11 comments:
I am in awe! As someone slightly mathematically challenged the idea of argyle boggles the mind. I love, love, love how it turned out. Way to go! Deb
Hi Colleen, I enjoyed reading your "About Me" page and laughed at the comment about painting the kids if they stood still. The reason I found your website is because you have a link to my website Silverspoonmurals.com. I'm glad the calculator was helpful! Great job on the Argyle...will have to try that sometime myself! Good Luck with your painting endeavors, looks like you have a real knack for painting things beautifully.
I love this! I am totally intimidated by a painting project this big. Truly inspiring! Thanks for checking out my changing table makeover... come see me again some time!
Hi Deb, Thanks for the comment. Math is not my strong suit either but it was easier than I thought. The tutorial I found was great! Have a great weekend!
So gorgeous! Thanks for sharing. Love your beautiful space.
Hope to see you on my blog:)
Love the name of your blog!
This project is truly fabulous, incredibly unique and extremely ambitious! Kudos!
I'm your newest follower; found you via Kim.
This looks fantastic! I don't think I've seen an argyle technique before. You chose nice colors, too, Colleen.
Wow! You must have SO much patience...not to mention talent! That is great. It would be great for any age!! Lori L
That is so cute and definitely a wow! I just do not have the patience to do that. Thanks so much for sharing at WUW.
That's a HUGE amount of work! It looks terrific.
Girl that wall is the bomb-diggity!!! You totally rocked it. I'm a happy new follower. Pop over for a visit sometime!
xoxo,
Kim
Post a Comment