PhotobucketPhotobucketPhotobucketPhotobucket Photobucket

Sunday, July 31, 2011

Many Many Thanks and My Postcard Table

I need to start out with some big THANK YOU's to a few other great bloggers. First, to Rachel at Holy Craft blog. She featured my Number 5 table on Wednesday. A big heart-felt thanks to her! Holy Craft is a great read and I look forward to checking it out everyday!

Also, to Amy and Emily at Sisters of the Wild West, thanks for featuring my Number 5 table as well. I'm so happy with all the great comments I've gotten on this table. Their blog is yet another one I read everyday. And their link party is always full of great ideas. Thanks girls!

Now on to a project I've been working on for a few days. I picked this beauty up off the side of the road. The broken glass and duct tape made for a scary looking table; but throw that away and underneath was an ugly duckling just wanting to turn into the swan.


This was a pretty straight forward project. I painted the table in Annie Sloan Duck Egg Blue and distressed it just a bit. It sat for a few days while I was thinking... (scary, I know :-)) The table seemed a little boring and I knew it needed some sort of kick. Then I came across a project at Red Hen Home. She had put a graphic of an old french postcard on the top of a coffee table and BAM!!! That's exactly what my table needed!!!


I went to The Graphics Fairy, a fabulous blog full of vintage images, to find the postcard graphic. I printed out the graphic and my great friend Kerry lent me her projector.


I was a bit scared to paint the image on the table because of the wording and fine lines. But the nice thing about the "shabby" look is that nothing has to be perfect! It just needs to look good when it's done.


I'm really getting into adding a little flair to table tops. I figure this way it will look nice whether you have something on top of the table or not. Two for the price of one :-)

I can't believe tomorrow is August 1st! It's been smoking hot here and the kids are starting to get restless. There's only so much swimming you can do. School starts in only 19 days. Are you ready?

I will be listing this table on my Items for Sale page soon. I'm also going to be a part of the Lincoln Art and Balloon Festival at the end of August! More information to come soon! Have a great week everyone!!!

Photobucket

I am also linking up to Wow Us Wednesdays at Savvy Southern Style and Miss Mustard Seed's Furniture Feature Friday. Another great week of inspiration I'm sure. Take a look!

Photobucket

Furniture Feature Fridays


Tuesday, July 26, 2011

I was featured!!!!!

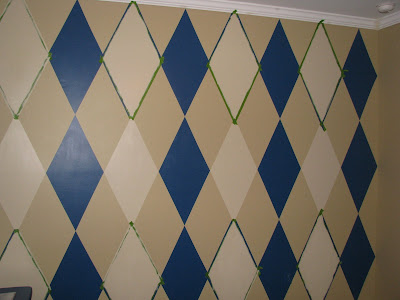
Oh my goodness...I am so thrilled right now! I was doing my late night browsing of all my fav blogs and I pull up Savvy Southern Style and BOOM!!! There is my argyle wall that I painted for my nephew's bedroom. This is my first feature!!!


Basically for those who don't know how the blog world works it's a bit like this...A blog has a link party where you get to link up any project(s) you would like to share. This leaves a small pic of your project and links back to your blog so others can see your post. It's a great way to share and get inspiration from other like minded bloggers. Then at the beginning of the next weeks link party the host usually pics several projects they like or were inspired by. And this week...mine was one of them!!!

Thank you so much to Kim at Savvy Southern Style! You've made my day, week, month!!!

I'm such a newbie at this that I don't know where to put the "I was featured" button. Anyone out there who can give me that info it would be greatly appreciated!!

Photobucket

Is this correct?


Monday, July 25, 2011

Madame Secretary

This is my first desk redo and I really enjoyed it. It seemed to take a while to finish but actually it has been done for several weeks. What took so long was hauling it out of the basement to get the final pics! I kept forgetting to ask my hubby for the help and wouldn't think about it until late at night and by then he's tired and it's dark outside. Perhaps I should invest in some flood lights for night time picture sessions :-) The neighbors would be thrilled!


I must say she was pretty scary when I picked her up at my favorite thrift store. Most of her knobs were missing and the ones still left were mismatched. Of course I was able to see right through that and snatched her up for a song.


I had to purchase new handles. Needing 9 of them and being cheap, I turned to eBay and bought those for a song as well. I got the idea for the 2-toned dresser from Miss Mustard Seed (of course). She's a very talented lady. Check out her blog.


I used paris gray and old white Annie Sloan chalk paint. That paint is so wonderful. No priming or sanding needed to begin. Just start with the fun stuff...painting! I'm planning on purchasing more colors of chalk paint this week and am so excited to try out some of the brighter colors!

What do you think? I love comments and read everyone with a smile on my face. Thanks for stopping by. Have a great week!
I'll be linking to several parties. Have a look at these other great blogs!


36th Avenue


The Shabby Nest


Thursday, July 21, 2011

Number 5

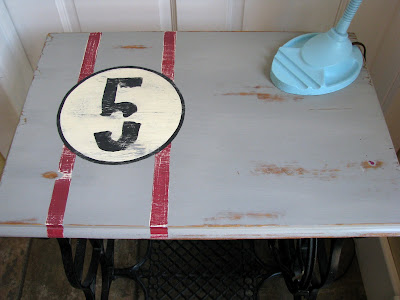
I'm sure I've said this before but this has got to be my favorite project so far. It was easy, fast and turned out exactly how it looked in my head.


This table has been my nightstand for at least (uh, hum) 20 years!!! I still can't believe I've had anything for twenty years. I'm only 19 after all :-) Of course I didn't get a before pic...why?...I forgot. But basically the top was stained wood. It was a little worn in a few spots but not bad. A few months ago I painted another table and liked it enough to use it as my new nightstand.

I couldn't decide what to do with this one so it sat, and sat, and sat at the foot of my bed. Finally I'd had enough and brought it downstairs to take to the basement. And you know how sometimes when you move something into a new environment an idea comes out of nowhere? That's what happened here. BAM!!! An idea!


First, I measured the top of the table then went to the computer to map it out. I chose the number 5 just because that's the number of people in our family. The shape of that number also looked great in the circle.


To transfer the design onto the table I used an old technique I learned many years ago. I took a soft pencil and colored on the back of the computer print out; turned the design over and taped it to the table. Then simply traced over the lines, removed the paper and voila there's a great imprint. It works like a charm!


I decided to paint the whole design a creamy white first. I knew I wanted to distress the table heavily and thought a layered look would give it more depth.


Next, I taped off the stripes. They didn't need to be perfectly straight but I did want them the same width all the way down.


To finish this off, I painted the number and circle border black. I was very tempted to distress this right away but waited until the next day so the latex paint had time to cure. Oh, I almost forgot...I used Annie Sloan Chalk Paint in paris gray for the table top. I knew this would distress beautifully.


The next morning I was so excited to get up and finish this table. As planned, I distressed the table heavily and applied two coats of wax for protection.


I'm sooooo happy with the way it turned out. And layering the paint worked beautifully. I love how the white paint peeks out from under the red stripes.


I will be linking up to Miss Mustard Seeds Furniture Feature Friday link party. Also, Funky Junk Interiors Saturday Night Special as well as the Sister Sunday Link Party at Sisters of the Wild West. And last but not least Shades of Amber Chalk Paint Link Party. I'm real excited to see what everyone else has been up to this week. Take a peek for yourself. Have a great weekend everyone and keep cool!!!

Furniture Feature Fridays

Funky Junk's Sat Nite Special


Wednesday, July 13, 2011

A Big Giant Sweater

My sister asked me to come down to her house to do a little something to her son Paulie's bedroom wall. She didn't want anything that her 3 1/2 year old would outgrow in a year or two, so no characters or toys. I was asking myself...what's left...some sort of pattern? Her boys are always impeccably dressed with cute polo shirts and sweater vests....mmmm argyle? She loved the idea! I did some research and found a great tutorial on the blog Design Dazzle.


Here's a before picture of the wall in his room...pretty plain.


Let me say at the beginning this project takes a lot of patience. I measured once, twice and even a third time. I didn't want to get half-way through and realize I made a mistake somewhere in the beginning. I'm talking from experience :-)


You can read a precise step-by-step tutorial on the Design Dazzle blog. Why reinvent the wheel right? But I will give you the cliff notes and show you my photographic step-by-step. To get started make sure you have a lot of green frog tape. This has become my "go to" whenever I need to tape something off for painting. I have found that blue painters tape just bleeds too much for me.

To figure out the diamonds I first needed to determine how many rows and columns we wanted on the wall. There is even an online calculator at Silver Spoon Murals to figure this out. I love the internet!!! At first we couldn't decide on three or four rows so I cut out diamonds in each size and decided on 3. Sometimes once you "see" it, you just know.

Once that decision was made the measuring began. Basically, I drew a bunch of rectangles on the wall. Then found the middle of each rectangle and marked the top, bottom, right and left side. I connected the dots by taping to form the diamond pattern.


I taped off all the blue diamonds first (every other row) and painted those. Once the paint dried I did the same thing for the light tan diamonds. I think it was about at this point my nephew Liam walked into the room and said "It looks like a big giant sweater."


Just an FYI: I went through two rolls of the green frog tape. And that was with reusing many of the pieces. If you don't want to reuse any I would say you'd need at least three rolls and perhaps four.


I have to admit I REALLY didn't want to do this next step. On the tutorial I read they used a stencil to make the fine dashed lines. I was concerned it was a bit too busy. I needed to figure out how to make a solid thin line. Back to the green frog tape.


First my brother-in-law and I placed chalk lines where the fine lines would be. Then I began taping...again :-)


I taped in one direction first. Painted those lines black, removed the tape then repeated this step in the other direction.


Here's a close-up view.


And here's the finale. My sister really liked it and I hope her son will too. He will be home from grandma and grandpa's tomorrow. I can't wait to hear what he has to say! I'm also painting a nightstand for his room but didn't get the time to finish it before we had to head home.

The kids had a great time playing with their cousins. And I can check a project off my list...a pretty good week!

I'm linking to

Photobucket

Check out what others have done this week! It's always inspiring.


Monday, July 11, 2011

Zebra My Heart

It's been a busy week in the Roate household. It just seems like the projects keep adding up. And it has nothing to do with The Painted Turtle!


I did manage to bang out this fun chair over the past week. It has been sitting on my front porch for years and desperately needed a makeover.


I painted the chair using some leftover paint then recovered the seat with a zebra print remnant I had sitting around. I think it really brings the chair to life!


I'm at my sister's house in St. Louis this week painting an argyle pattern in her son's room. I'll post all about that project soon.

I'll be posting this chair on my Items for Sale page. Thanks for looking. Have a great week.

I'm linking up to the Amaze Me Monday link party and Metamorphosis Monday at Between Naps on the Porch. Check out these great sites and all the great ideas!